Confluence Cloud Changes

Confluence receives changes as a group on the second Tuesday of each month. Changes will roll out between Tuesday and Thursday.

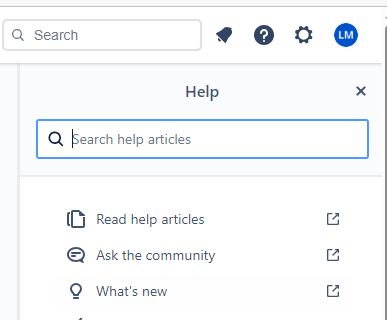
To view the full list of new and upcoming changes, select the Help button in Confluence and the What's new link. 
Below is a summarized list of new changes:

Month Change is rolling out

Category

Summary

Description

November

Reactions

Default Reactions in Confluence

3 reactions (thumbs up, clap, tada) will now be shown on pages with no reactions, instead of the reaction picker button. This will make it easier for users to react to pages.

November

Tables

Resize tables to custom widths

Now you can resize tables to any width, whether you're editing a fixed-width or full-width page. Use the resize handle to proportionally grow or shrink your columns, and guides to align your tables with other content on the page.

November

Media resize

Extended media resize experience

You can now resize media elements to any width. You can also update the pixel values for the width and height of a media element in the media toolbar.

What's new?

  • You can now resize media elements to any width, not just the predefined sizes.

  • Pixel values for the width and height of a media element will now be displayed in the media toolbar.

  • These values can be updated to change either the width or height of a media element. Note that changing one value will update the other proportionally.

  • Guides that were previously hard snapping are now soft snapping. This means that you can now select any custom size for a media element, and it will resize to that size, even if it is not a guide value.

  • Guides will now show other media or elements on a page that you can align sizing to.

How do I use it?

To resize a media element, select it and drag the resize handle located to the right or left of the element. The height will be resized proportionally to the width.

To update the pixel values for the width or height of a media element, open the media toolbar and enter the desired values.

Existing media

Media added to a page before this update will be using the old percentage-based sizing. To resize these items, they will need to be converted to the new pixel-based sizing. To do this, select the media item and use the drag handle to resize it, or select the Convert to pixels button in the toolbar. Media items that need conversion will have a yellow dot in their top-right corner.

November

Smart Links

More detail in Smart Links with better features

We've upgraded Smart Links to show the information you need with improved features to increase your productivity.

The changes include modernised Inline, Card, Embed, and Hover display views with new layouts, shapes, colors, and fonts.

To view these changes:

  1. Create a new Confluence page.

  2. Copy or type in a URL.

  3. Select the link.

  4. Change how the link is displayed from the Smart Link toolbar.

  5. Select Publish.

  6. Hover over the display and interact with link elements.

October

Templates

Improved templates experience

When using the template browser, you can now select (or de-select) multiple categories as filters. We have also introduced two new categories: Featured and My Templates.

Open a blank page by selecting the Create button in the top navigation. The template browser will open on the right.

The template browser will disappear as soon as you start typing. If you
need to change templates, you can open the browser again: select Templates & import doc from the more actions menu (...) in the upper right.

October

Pages

Move pages and blogs easily when editing

  • To make moving pages and blogs easier than ever, even while creating new content, we've:

    • added a pencil icon to the editor breadcrumbs at the top of every page. When selected, it allows you to move your page or blog without interrupting your editing flow.

    • enabled a Move option in the more actions (•••) menu within the editor for all pages or blogs that you have permission to move. (As always for page or blog moves, you must have permission to delete and create content in the new location.)

    • upgraded the dialog for moving pages in the editor to show a preview of the page tree.

    • upgraded the dialog for moving blogs to look more modern and visually appealing.

    Learn more about moving pages and blogs from within the editor

October

Pages

Publish and pdate your content with more precision than ever

  • We’re improving the experience of publishing and updating pages and blog posts.

    The improved experience aims to remove the anxiety that can emerge around content creation and distribution. It does so by providing users with more transparency and control over where a page will be located and who will be able to see it when it's published.

    When you first go to publish a page or blog post by selecting Publish…, you’ll encounter a new modal that consolidates several publishing options and settings into one place. There, you’ll be able to:

    • Choose where the page or blog post will go.

    • Choose who will be able to view or edit the page or blog post once it is published.

    • Add version comments to describe the page you are publishing. These comments can be helpful later when reviewing a page’s history.

    • Schedule a publish for a future date and time.

    • Convert a page into a blog post.

    Other than location and access, all fields in the publish dialog are optional. Spending the time to set your preferred settings up front can save time on future updates.

October

Images

Add borders to images on a page

This new and improved feature offers a cleaner way to separate content and images with additional customization options. You can adjust the border size and choose the right color to give it the emphasis you're looking for.

To add a border:

  • Select an image to make the toolbar appear.

  • Select the leftmost button with the square icon to apply the border.

    • Customize the border by selecting the arrow next to the icon.

September

Pages

Switch themes while using Presenter mode

You can now switch between dark and light themes while using Presenter mode.

Try this out:

  • View a page.

  • Select More actions (•••).

  • Select Presenter mode.

  • Select the Presenter settings (⚙️) cog.

  • Use the theme selector to switch on or off dark mode.


JavaScript errors detected

Please note, these errors can depend on your browser setup.

If this problem persists, please contact our support.